|
|
教程一 : 基礎dialog 應用
-------------------------------------
無論做任何事都好,周詳的計畫是必須的。沒有計畫,做任何事都會一塌糊塗。 
-------------------------------------
今次我們要弄一個dialog,配合上一些按鈕來發揮其功效。
-------------------------------------
1.打開觸發器
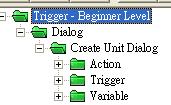
2.把自己的資料分類好( 我這裡的分法 就是dialog - tutorial 1 - variable
  - action
  - trigger

3.在variable欄,創建一個變數(如下圖) : 
Dialog:Dialog:DialogID ,種類設為dialog,第一個陣列設3 (3個種族) 第二個陣列 設2(一個用於建造單位,稍後會有其他)

4.暫時先弄這個variable,接下來於action下面創造一個新的action definition(快捷建:ctrl + alt + R)
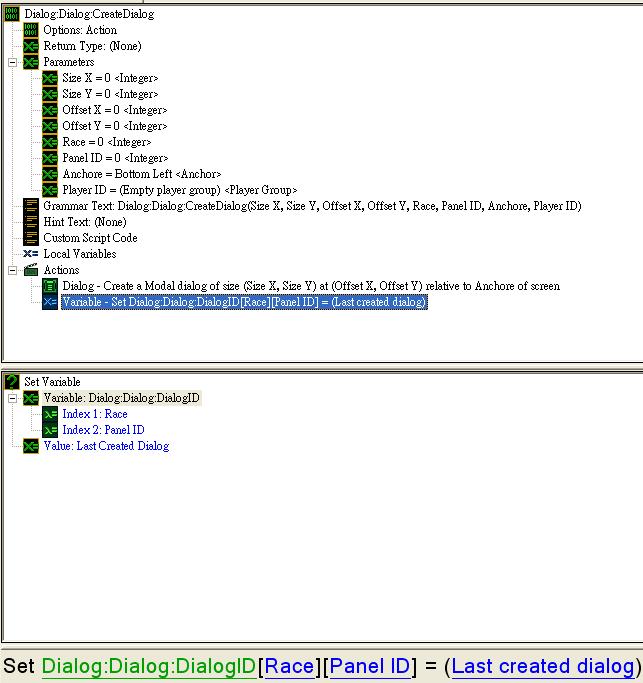
名字設為dialog:Dialog:CreateDialog
用途為創建一個空白的dialog,並給予一個變數來代替。
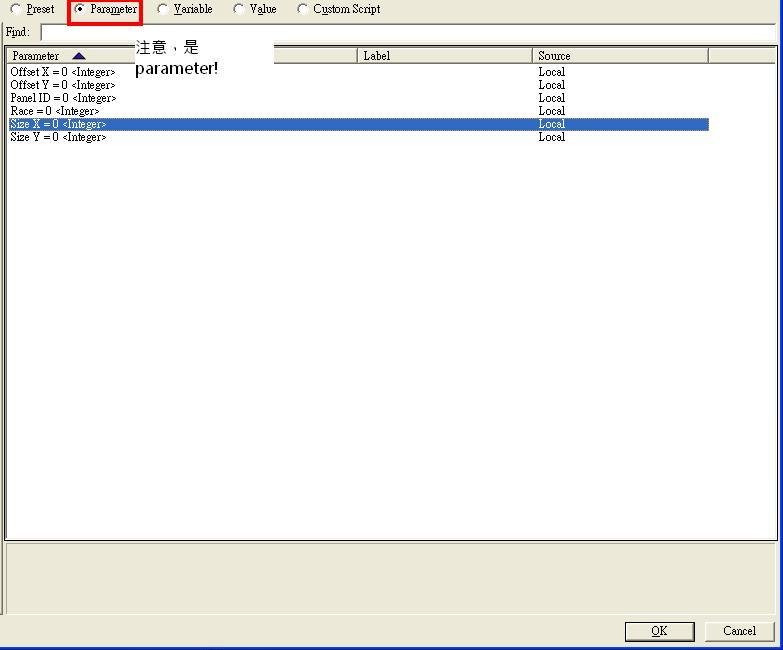
接下來弄些parameters(參數),parameter作用是代替某些空白的參數。parameter與variable不同,parameter能夠於trigger subview等地方設置新的參數)   
 Parameters
        Size X = 0 <Integer> 大小(x)
        Size Y = 0 <Integer> 大小(y)
        Offset X = 0 <Integer> 偏移(x)
        Offset Y = 0 <Integer> 偏移(y)
        Race = 0 <Integer> (種族)
        Panel ID = 0 <Integer> (面板id)
        Anchor = Bottom Left <Anchor> (與某個地方綁定)
        Player ID = (Empty player group) <Player Group> (玩家的id)
5.有了parameters,接下來開始弄action(行動)
非常容易的。
        Dialog - Create a Modal dialog of size (Size X(上面的parameter), Size Y(上面的parameter)) at (Offset X(上面的parameter), Offset Y(上面的parameter)) relative to Anchor(上面的parameter) of screen

        Variable - Set Dialog:Dialog:DialogID[Race][Panel ID] = (Last created dialog)
如此設定後,便能讓用者自行設置dialog的大小,暫時來說因為action比較少,直接弄也可以,但當後來要設置dialog的各種參數時,有了action便能使你的生命變得更美好了…(至少不會被密麻麻的action弄得頭暈)

6.有dialog 沒有dialog item,那只是一個面板而已,一點作用都沒有,於是我們一起弄些新的按鈕吧。
一樣新的變數 : Dialog:DialogItem:ButtonID 用來記錄各個新按鈕的id,方便日後使用
7.新action 名叫:Dialog:DialogItem:CreateButtonWithImage 如其名,用來創造一個有圖片的按鈕
一樣的弄新的參數
    Parameters
        Dialog = No Dialog <Dialog> 指定綁於哪個dialog
        Offset X = 0 <Integer>
        Offset Y = 0 <Integer>
        Image = No File <File - Image> (注意)

        Tooltip = No Text <Text>
        Race = 0 <Integer>
        Unit ID = 0 <Integer>
        Anchor = Bottom Left <Anchor> 一樣,綁定於dialog的哪個方向
有了參數,少不得action了
    Actions
        Dialog - Create a button for dialog Dialog with the dimensions (76, 76) anchored to Anchore with an offset of (Offset X, Offset Y) setting the tooltip to Tooltip with button text " " and the hover image set to "" 創造一個空白的按鈕,不需要給他任何東西,更不要給他圖片。原因是我們見到的button其實是從一張dds裡慢慢抽出button的各個部份拼湊而成。假若你在按鈕中使用圖片,系統會利用該圖片來拼湊按鈕,弄成一個像屎一樣的東西。
        Variable - Set Dialog:DialogItem:ButtonID[Race][Unit ID] = (Last created dialog item) 設定變數為上面弄的按鈕,方便日後用途
        Dialog - Create an image for dialog Dialog with the dimensions (76, 76) anchored to Anchore with an offset of (Offset X, Offset Y) setting the tooltip to "" using the image Image as a Normal type with tiled set to true tint color White and blend mode Normal 這個圖片的作用是放在button 之上,使別人還是能看得見一張圖片。
8.於是2個新的action 弄好了(但未能發揮我們的功效),現在於trigger底下新建一個觸發 名叫:dialog ini.
jn事件少不了就是
    Events
        Game - Map initialization (地圖初始化)
行動 , 由於我們上面弄了2個新的action 不用繁瑣的再弄一次,直接在 -General [ 注意有2個general 我們要的是最上面的那個 ]找尋我們的2個action,先加入dialog:Dialog:CreateDialog,並指定參數

考慮到不同的種族,不可能建同一樣的單位吧,因為我們加上一個新的action - pick each player in player group and do (action) (這次在 player group的底下) [ 中文大概是挑選在玩家群組的各個玩家]
        Player Group - Pick each player in (All players) and do (Actions)
然後於action 下面加if-then-else(在大約中間的general處可以找到)
if (假如)
                    If
                        (Race of player (Picked player)) == Zerg
假如被挑起的玩家是zerg(蟲)
then (便)
                        Dialog:Dialog:CreateDialog(300, 400, 50, 0, 1, 1, Left)
創造一個dialog 300*400,x偏移50個單位,並綁定至屏幕的左方。
                        Dialog:DialogItem:CreateButtonWithImage((Last created dialog), 25, 25, Assets\Textures\btn-unit-zerg-zergling.dds, "Create a zergling at the point you ...", 1, 1, Top Left)
創造一個有圖片的按鈕,圖片設為zergling(小狗)的圖標,tooltip隨意打…沒關係的
else(否則)
General - If (Conditions) then do (Actions) else do (Actions) If (Race of player (Picked player)) == Protoss
 判定其是不是神族,然後再跟著上面弄,直至三族都弄完。(假如沒弄新action,你可以想像得到那些密鋪的trigger多半會令你發狂)其實你也不必這樣,也可以直接爆出幾個dialog而不用if-then-else,因為後面會有判定的語句。
簡單的dialog 弄完了(但沒有任何的功效) 以下是根據上面弄得出的成果。你會發現沒有顯示出來,那是正常的,以後我們會有方法把他弄出來。

---------------------------------------------------------
章節 二 給予按鈕一個功能
1.一樣新的variable:
Dialog:DialogItem:CheckButtonIsClickedOrNot type : boolean(真假二值 - 布爾數學邏輯)
2.新action : Dialolg:DialogItem:EnableCreateUnit
parameter:
Parameters Race = 0 <Integer> Unit ID = 0 <Integer> Dialog Item Check = No Dialog Item <Dialog Item> 判定是哪個按鈕被按
action:
Actions General - If (Conditions) then do (Actions) else do (Actions) If Dialog Item Check == Dialog:DialogItem:ButtonID[Race][Unit ID] 判定按的按鈕究竟是什麼 Then Variable - Set Dialog:DialogItem:CheckButtonIsClickedOrNot[Race][Unit ID] = true 把相對應的 boolean 設為真,日後作用
Else
3.新action: Dialog:DialogItem:CreateUnit
Parameters Race = 0 <Integer> Unit ID = 0 <Integer> Unit Type = No Game Link <Game Link - Unit> Point X = 0.0 <Real> Point Y = 0.0 <Real> Player ID = 0 <Integer>
action:
    Actions
        General - If (Conditions) then do (Actions) else do (Actions)
            If
                Dialog:DialogItem:CheckButtonIsClickedOrNot[Race][Unit ID] == true 判定該變數是否"真",假若是真,便於指定地點創造一個單位
            Then
                Unit - Create 1 Unit Type for player Player ID at (Point(Point X, Point Y)) using default facing (No Options)
                Variable - Set Dialog:DialogItem:CheckButtonIsClickedOrNot[Race][Unit ID] = false
            Else
4.新trigger : Dialog:EnableCreateUnit
event : 
        Dialog - Any Dialog Item is used by Player Any Player with event type Clicked 任何一個 物品 被使用
action 運用上面的 Dialolg:DialogItem:EnableCreateUnit 並根據參數 填空位,大約如下,切記把dialog check 設為used dialog item(被使用的物品)。

5.這樣子,上面弄的variable只要在按鈕被按時,就會變成真,之後弄新trigger :Dialog:CreateUnit
Events UI - Player Any Player clicks Left mouse button Down..
這個事件,作用為任何玩家按下了 左鍵。
接下來action 用回上面的
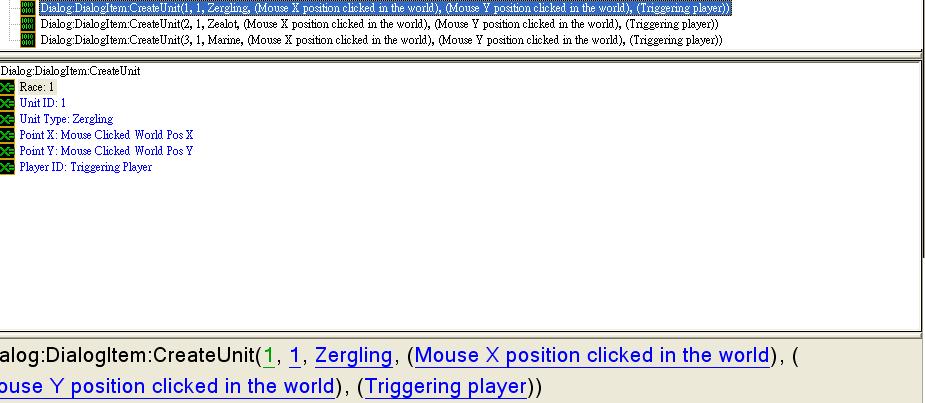
Dialog:DialogItem:CreateUnit(1, 1, Zergling, (Mouse X position clicked in the world), (Mouse Y position clicked in the world), (Triggering player))
[因為上面的action 包括了判定字句,因此不需特別再弄]
有了(Mouse X position clicked in the world)和(Mouse Y position clicked in the world)可以追踪點擊的位置,並於該處創造一個對應的單位。

於是一個完整的按鈕便出來了,但這遠遠不夠,因為我們必須要令dialog出來能按到。於是,在dialog ini的末加上一句代碼:
Dialog - Display button 1 of size (200, 60) with text "Unit Panel" at Right of screen with offset (50, 0) (run No Trigger when button is clicked)
需要注意的是,這裡的button是指screen button (營幕按鈕) 它是永遠存在的,不需要特別的show hide…除非你有其他用途,例如cinematic需要隱藏掉按鈕。
新action definition : Dialog:OpenDialog
parameter :
Parameters race = No Game Link <Game Link - Race> RaceID = 0 <Integer> PanelID = 0 <Integer> PlayerID = 0 <Integer>
action:
General - If (Conditions) then do (Actions) else do (Actions) If (Race of player (Triggering player)) == race 如果玩家是指定的種族 便開啟指定的dialog Then Dialog - Show Dialog:Dialog:DialogID[RaceID][PanelID] for (Player group(PlayerID)) Else
然後新的trigger - Dialog:OpenDialog
event :
Dialog - (Screen button 1) is used by Player Any Player with event type Clicked
注意screen button亦屬dialog item的一種。
 action: Dialog:OpenDialog(Zerg, 1, 1, (Triggering player))判定不同種族,來開啟不同的視窗。
於是一個基礎的單位建造面板成功了,當然你可以加上更多更多的action來豐富你的new action definition但有鑑於這是基礎觸發,我就不寫那麼多了(我的另一個練習包括了資源是否足夠,如果不足夠便隱藏;此外亦有建築和科技判定。亦有一個科技樹)
效果圖:
-----------------------------------------
如果這能夠幫助得到大家,那麼我便滿足。 假若大家有其他的需求可以問,我會盡量幫你的忙。[其實本來我想拍片的,拍片方便得多,但有鑑於我的聲音比較 那個 就算了]
我會持續更新教程…假若有人支持的話...(沒支持一切都是浮雲,畢竟沒推動力去弄。)
|
评分
-
查看全部评分
|